Thursday, February 21, 2013

There's always snuggle time for Ash

Even with all of the renovations, David still has time to snuggle with Ash at night. This picture just sums up how unbelievably adorable we think our dog is. 

Monday, February 18, 2013

With the cabinets in place, it starts to feel like a kitchen!

This is a very exciting post for us because we finally have a good sense of what our kitchen will look like. This is because..... we have cabinets! Harvie spent the weekend with us and he and David worked like crazy to get the walls painted and the cabinets in place. They had a hard time making them level, but in the end got everything correctly in place using a variety of trimming, shimming, and stiffening techniques. Because our house is so old, the "level" cabinets don't line up with the ceiling - its all topsy turvey! What I say to that is that our house is filled with unique character. 

Here is a picture of Harvie working on cabinets one and two. The one on his left goes over a small set of drawers, and the one on his right goes over the fridge. 


One finished wall of cabinets. Here, the one on the far left goes above the stove/microwave combo.


Our peninsula! The center cabinet, next to the dishwasher, will house the sink. You can see to the left in this photo the above shown wall of cabinets with the fridge, set of drawers, and stove in place.


Here is the pantry cupboard that is inside our "pantry," now re=purposed as a laundry room. Because of the cabinet configuration we probably will use this for food storage even though its in the laundry area, though if we could make it work I see this as being a good place to store linens and other household items. 


These cabinets are nestled in on the left hand side of the chimney, and will probably be where we store our dishes and less commonly used items. Oh, because its so obvious here - please ignore the gaudy hardware on these cabinets. We have a trip planned to Home Depot to pick out more modern handles. 


Here is a good panoramic view capturing most of the kitchen. The gates are up in the doorways to keep the doggies safe from the construction zone. 


Another panoramic view, from the other angle. The empty space to the right of the boxed in chimney will eventually house another upper cabinet.


We have an appointment on Wednesday for making templates for our granite counter tops. We went to a granite shop (Stone Surfaces in Burlington, MA - very friendly and knowledgeable staff and their showroom is conveniently in the same spot as their warehouse!) today to pick out our granite. We had been last week and had a couple of "colors" in mind, but went back today with a paint sample, a tile, and a cabinet drawer. We were shocked to find that the ones we had liked previously didn't match at all! We ended up choosing a granite called Ivory Gold which provided the contrast we were looking for. As you can see in this picture, the walls are a very similar tone to the tile floor. We chose these colors so that they would not look awkward or harsh with the color of our cabinets, but seeing it all pulled together we decided we wanted the counter top to stand out a bit more. We will also pick our bar stools and light fixtures with contrast in mind as well.

The full kitchen album has been updated here: https://plus.google.com/photos/111337432367013111703/albums/5846031753827674593?authkey=CJXUo6L4muCRIQ

Our kitchen has walls!!

David and Grandpa John spent Wednesday and Thursday of last week picking up drywall from Lowes (happened to be more convenient than Home Depot this time), passing the drywall through the kitchen window (with the very important added utility of my own impressive muscle power), and installing the drywall. David then spent Friday night finishing the spackling, and he and his dad were ready to go with painting, clean up, and cabinets on the weekend. Here are some pictures of the finished job! 


Sunday, February 17, 2013

Tiling the kitchen floor

After spending the morning digging ourselves out of the snow from Nemo last Saturday, David spent the afternoon doing his best to level the biggest dips in the kitchen floor.  This was done by first smoothing mortar onto the sub-floor, and then placing pieces of concrete board in the mortar. The center portion of the floor (in line with the chimney) is still higher than the rest of the floor, but bringing up the edges to match the center would have made the whole floor too high. 


After the mortar for the leveled areas had dried, David covered the entire floor with a layer of mortar followed by a layer of concrete board. According to the backer board website, putting a layer of mortar under the concrete board helps minimize deflections in the tile, thereby extending its lifespan and reducing the chance of cracking. The concrete board is also screwed into the floor - with a total of 800 screws! 


Next to go in was the tile. We chose a 12 inch ceramic tile from Home Depot and 3/16 inch spacers. To cut the tiles along the perimeter we used a tile saw borrowed from my Uncle Dan. The strategy here is to cut and space a small section of tile, and then to use a trowel to put mortar down on the concrete board and press the tiles into the mortar.


The last step to installing the tile floor was filling the spaces with grout and then wiping the tiles clean. David used a fancy tub of epoxy grout because it doesn't require sealing and is more stain resistant. I helped by washing the tiles and smoothing the grout at the end! The finished floor looked superb.


More kitchen renovation pictures: https://plus.google.com/photos/111337432367013111703/albums/5846031753827674593?authkey=CJXUo6L4muCRIQ

Saturday, February 9, 2013

The aftermath of storm Nemo


David and I were supposed to go to our friend's wedding in IL today, and sadly the storm prohibited us from traveling. It sounds like they are going to have a fantastic celebration, and we are very sad to be missing it! Instead of heading to the airport with a suitcase, we woke up this morning and headed to the sidewalk in snow gear carrying a shovel. We had to shovel a pathway just to walk the dogs! Ash actually proved that he was light enough to mostly prance through the top layer of the snow, which was pretty cute to watch. David and I shoveled for over 2 hours this morning and managed to "blaze" a way through the sidewalk area and made a small dent on the driveway. We'll have to go back out later and attack the driveway again before we can drive anywhere. Here are some pictures of our efforts: 

Notice the snow pile in the yard!!!


A picture of my trail blazing efforts 


At the edge of or property there was a snow drift taller than me that I had to break into. I'm standing on a lot of snow while shoveling, I basically dug myself a hole to stand in so I could start heading down the sidewalk. Unfortunately for us (at least in terms of snow storms), we have a corner lot - double the sidewalks to care for! 


Our cars are having a snow bath :) 


Friday, February 8, 2013

Winter Storm Update

The winter storm is in full swing in Somerville at 11:30pm! We decided to hop into our ski pants and go outside to take a few pictures when we took the dogs out. I maintain that the storm has still been over-hyped, but I think we have a good 6" outside right now with snow still coming down strongly. We'll update you in the morning after some shoveling!


Darkest Before The Dawn

We've made some progress in the kitchen since Tuesday when the big demolition started! To remind everyone what we were starting with, here are a few pictures:


Tuesday was spent mostly getting things ready to start demolishing. Moving out all of the appliances, getting the new kitchen set up, and sealing off the kitchen doorways to limit dust going in to the rest of the house. The only access to the kitchen is now through the back door.

With a FULL day of demolition on Wednesday and some cleanup on Thursday, I brought 2380 lbs to the dump! I was tired at the end of Wednesday.

Load one of two
The walls had a lot of stuff to take off. There was wainscoting on the bottom covered by paneling. More impressive were the layers above waist height. There was wallpaper, then drywall, then 4-5 layers of wallpaper, and then finally plaster. It made of slow going getting all of it off! However, it will be nice to recover some of the extra wall depth for the kitchen.


We'll hopefully have another update tomorrow with the subfloor down!

We love your feedback!

Just a quick note on our blog posts - there is a section at the bottom where you can leave a comment if you wish! We love to hear what you guys have to say about our projects and stories, so please share something if you have a minute. It's great to hear back from everyone via email, but it makes our blog feel like a more dynamic place if we get post-specific comments. We'll do our best to respond :)

The big kitchen floor plan debate

Since moving in, we have had numerous discussions about what kitchen floor plan would make the most sense. We obviously were looking to maximize functionality without making the space feel too cramped. Our kitchen is particularly hard to work with because there are four doorways and two tall windows (so you can't put a counter in front of them). The initial layout had very limited cabinet space, though because of the pantry storage we found it more functional than we expected it to be. The only counter space we had was a small section next to the fridge and an awkwardly shaped section of counter next to the stove. Therefore, we primarily used the table for prep work. Our only lower cabinet was next to the sink and was very narrow, we gave up on keeping our pans stacked neatly and basically wedged everything in however we could, closed the door, and waited a second or two to make sure stuff didn't come crashing out. One thing we did realize (discussed some here) was that we liked having the washer and dryer centrally  located, so we kept this in mind when we planned our new kitchen. Here's the layout of the "old" kitchen:


For the new kitchen layout, we had to work within the confines of cabinets we bought off of craigslist last winter. I really wanted to have solid wood cabinets, but buying those new would have been very costly (multiple thousands, Ikea pressboard cabinets are in the 4k+ range!). We decided to give craigslist a shot, and were lucky enough to find a set that we liked and seemed to contain the functionality we needed - all for about $1000 (I don't remember the exact cost). They have been stored in the basement since then. We also bought a really nice Bosch dishwasher off of craigslist for $500, a range/microwave combo for $475, a front loading stackable washer/dryer set for $600, and a fridge (we purchased this item when we moved in) for $400. Total appliance cost for the new kitchen/laundry: $1975. This sounds like a lot to me, but given the fact we purchased pretty high quality appliances I think we did well. To get some comparison, equivalent appliances would have cost around $5200 new from Home Depot. In our mind none of our appliances have yet reached their half-life point, so a 62% discount seems pretty good. To figure out how everything would fit I created a to-scale Power Point drawing of each kitchen item and the kitchen outline. Here is our final plan: 


We will keep you posted on our progress!!!

Thursday, February 7, 2013

Our hallway gets "fridgeified"

As mentioned in the last post, David has taken time off from work to renovate the kitchen. He has finished the bulk of the pantry work and is now well under way with the kitchen (details). To keep the rest of the house livable and clean we have completely closed off the kitchen from the rest of the house using plastic and lots of duct tape, so the only way to access the kitchen now is through the back door to the house. While the kitchen is under renovation, we have the luxury of our very own hallway kitchenette, complete with a full sized refrigerator and microwave. We cooked a week's worth of food in advance (chicken for salads, chili, cornbread) before we started taking the kitchen apart, and have been heating/storing/prepping our food in the hallway and washing our dishes in the bathroom sink.


We just rolled the fridge right through the kitchen door and into the hallway - the freezer door doesn't open entirely without moving the stool next to the microwave (hard to see), but it works! 


We have stored essential cups/plates/bowls/silverware/knives in this cupboard that used to be my great grandmothers. The cupboard usually houses all of Ash's things! Those have been temporarily relocated to our bedroom closet. 


Me being the weirdo that I am, I think it's kind of a fun adventure! It's like an organizational challenge :) The kitchen will still be out of commission this coming week so I plan to make a trip over to my grandmothers (storm permitting) to cook some more food and do a load of laundry. Grammy Pat and Grandpa John actually stopped by this morning to see our progress (and the bathroom, which they hadn't been by to see) and we managed to serve them tea and have lunch! Granted they brought the lunch food, but we were able to provide the eating-ware :D Stay tuned for kitchen details!

Wednesday, February 6, 2013

The pantry becomes a laundry room

We've been trying to figure out when we were going to renovate the kitchen and finish up the pantry, the largest renovations we've attempted in the apartment so far. Luckily, on the spur of the moment, I was able to take a few weeks off from work to really push hard on the kitchen. Caroline still has research, but I'm able to throw myself at the project 100%. We'll be updating the blog more often as there should be a lot more work completed over the next several weeks.

We've gone back and forth about the pantry and had been thinking for the last year or so that we were going to put the washer and dryer in the basement, creating a little laundry area of sorts. This would leave our pantry as it is currently, a huge uninterrupted expanse of shelving. The laundry area downstairs would have a decent floor, be clean, and I was going to make it "Caroline Approved". However, as the day to start the pantry renovation drew nearer, we realized that we really liked having the washer and dryer in the apartment. It means you don't have to put shoes on to take it down there, the dirty (or clean) clothes can sit out in a hamper, and it just generally feels like less of a trek to do laundry (even though it would have been a whole 15 steps).


So, we decided to put the washer and dryer in our pantry. We junked the set we bought from the previous tenant (more like a gift for a mandatory donation towards her moving fund) and bought ourselves a front loading high efficiency set off craigslist. The best part of it is that I can see the clothes cleaning now! I'm mesmerized by the clothes tumbling one direction, then back again, then water, then more tumbling..... Caroline finds this hilarious.

With the layout set, we tore in to the pantry, removing all of the old shelving as well as a little cabinet. The floor (tile) also came up. It didn't take long, but it left us with some pretty nasty holes in the wall where the shelves were. We decided not to take down the plaster walls, because other than where the shelves were they were in decent shape. So we used our standard approach to repairing plaster walls: (1) screw in the parts that are "ponky", (2) fill screw holes and holes where the plaster was loose with lots of spackle, (3) put a skim coat of spackle on areas of the wall that aren't super smooth, (4) sand, primer, and paint.


It was a large spackle job and required about four coats. The holes were down to the lath, with some chunks missing up to 2" square. The joint compound shrinks and won't dry right if you put it on too thick, so many coats are required. I used to try to make it as close as possible to "finished surface" while applying the compound, but I've learned that it is a heck of a lot faster to do 80% of the quality in 20% of the time and then sand it down. I normally use a small sanding block, but this time I broke down and bought a REAL drywall sander!
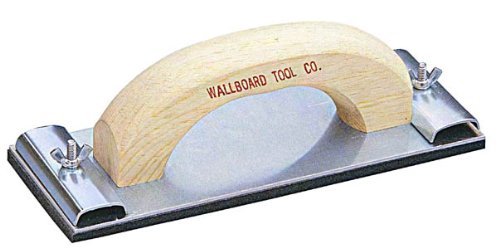


It is larger (9" long) and is MUCH easier to create a flat surface with. The foam helps smooth over slight transitions, but it is large enough such that it works almost entirely on the high spots. In addition, it takes off the compound REALLY fast! I highly recommend spending the $8 on this tool, as it made the sanding process a lot easier.

Finding a color was, in classic David and Caroline fashion, difficult. We tried 7 samples before deciding on "indulgent mocha", which was almost identical to the color the pantry was previously painted. Go figure. Either way, the ceiling, molding, and wainscoting are now white (cotton fluff) which looks much better.


You'll notice that there is a large gap where the molding was missing from the above the wainscoting. I'll fix that later! 

We decided on tile for the pantry (now a laundry room) and kitchen, and after actually reading the directions for my backer board found out that I needed to put mortar under the board, something I didn't do in the bathroom. It isn't the end of the world if you don't do it, but there is a higher potential for a cracked tile if your floor is "bouncy". The mortar between the underlayment and the floorboards smooths out any imperfections and supports the cement board for a floor with no deflection.


We went with epoxy grout because it was highly recommended for stain resistance, something we had heard from coworkers was a problem in kitchens. It doesn't require sealing (good), but has a very short working window. I managed to work quickly and finish it before the grout set. This picture also shows the baseboard and trim I put to cover up the hole above the wainscoting. I used my new(ish) table saw to cut out a .5x.75" notch the length of the board which allows it to slide over the top of the vertical boards. It worked well, although Caroline still says that we'll "need to hide it behind a shelf"!

Last came plumbing!


And the finished product! It looks like we'll need a stool for Caroline.


We are really happy with the "finished" look of the room, though we have yet to install shelving and/or cabinetry.